

How To Set Out A Curved Wall
By Brian Knight
Let's await at a skilful method for building curved walls curved-face up cabinets. A while back, equally I was waiting in the reception entrance hall of a major American corporation, I had the run a risk to adore the curved reception desk and other oak furniture in the room. All the same, when I examined the reception desk more closely, I could run into facets in the oak veneer instead of a nice, smooth curve. I immediately realized that the cabinet builders had sawn closely spaced saw kerfs in the back of the console so they could curve it to shape. I thought at that place must be a better mode.
The "better way" I constitute to build curved walls and cabinets comes from building proficient Jon Staudacher. Jon's boat and aeroplane edifice background, coupled with the unique backdrop of Due west SYSTEM® Epoxy, take combined to create very elegant solutions to hard construction issues.
Building a curved wall with no "kinks" is rarely successful, but Jon'due south method turns the chore into a no-brainer. No special skills are required, very few, if any, fasteners are needed and the fourth dimension spent building the wall is shorter than using conventional methods.
The basics of edifice a curved wall
This curved wall consists of thin plywood glued to standard 2″x studs (or 1″x if the wall is not load-begetting). The plywood is hands bent into smooth, fair curves and the studs provide rigidity. The play a trick on to this process lies in not trying to fasten the plywood to the standing studs. With the conventional method, you well-nigh always have a flat spot at any butt joints and it is tough work trying to forcefulness the plywood against the studs, especially if the wall's curve is concave. With Jon's method, the studs are bonded to the plywood earlier the plywood is bent into position. No fasteners are necessary to adhere the studs to the plywood.
Layout the curved wall
Yous need a large, apartment surface on which to build the curved wall (the subfloor). Depict a line where the bottom plate will sit down on the floor full-size and in the proper location. Measure the length of the wall. (Yous could calculate the length of the wall, but it is unremarkably more efficient and accurate to describe the wall and accept measurements from the total-calibration drawing.)
Proceed the stud and butt blocks back from the edge. Bond studs with globs of thickened epoxy.
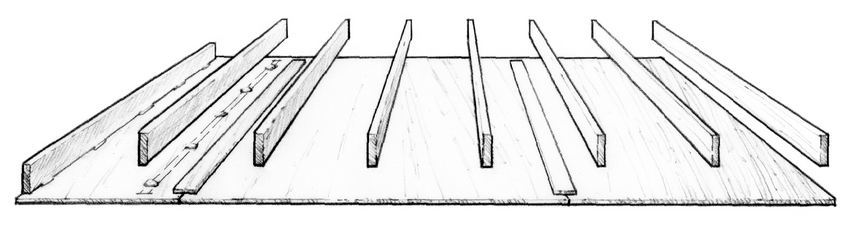
Bail the plywood together
Once yous have determined the length of the curved wall, lay enough plywood sheets on the subfloor, butted long edge to long edge, to brand the wall. The thickness of the plywood is adamant by the radius of the curve y'all are building. Thin plywood like 3mm for tightly curved walls, heavier plywood for more gently curved surfaces. Apply a butt block strip over each seam in the plywood. This is ane area where yous may need to utilise a staple or two. Wet epoxy is slippery and the butt block volition slide around unless you tack information technology in place. Use the aforementioned plywood to brand the butt block as used to make the wall. The cake should be a minimum of a couple of inches wide — enough surface surface area to keep the articulation from breaking when y'all bend the plywood while making the curve in the wall.
Add the studs
Now you take this dandy big piece of plywood laying on the floor. It is viii′ loftier and may exist many sheets of plywood broad. The side by side step is to lay out the stud location on the plywood. Studs are typically set at 16″ centers, so mark the centers of the studs at the tiptop and bottom edges of the plywood. Arrange the stud layout marks so they miss the butt strips. Cut the studs 3 inches shorter than the curved wall's superlative. (An 8′ high wall will take studs that are 93″ long.) This leaves space for a 1.5″ plate at the bottom and top of the wall. If the wall is not load-bearing, utilise 1″ 10 4″ stock for the studs, and if the wall has to support a load (or if the building inspector requires it) use 2″ x 4″ stock for the studs. You practice non need to worry too much virtually bent or bowed studs. Equally long equally the plywood is on a flat surface, the epoxy will take intendance of whatever gaps between the stud and the plywood.
Utilize epoxy similar you lot would use nails—a glob every foot or so to attach the stud to the plywood. Mark the full length of the studs then you can identify epoxy where the stud is in the middle of the console. Mix a batch of resin and hardener. Every foot or so, castor a thin coating of the epoxy mixture on the plywood and on the stud. And so thicken the epoxy with 403 Microfiber Filler to a peanut butter consistency and put a proficient-sized glob where you have pre-coated with the original mixture. Locating the stud on its layout marks, squish it into the globs of epoxy advisedly. Yous may want to hold the stud in place, with duct tape, bricks, or anything else you accept available, until the epoxy cures. You do not demand strong clamp pressure—that is the feature of epoxy that makes this whole idea piece of work. As long as epoxy bridges between the face up of the stud and the plywood the epoxy will bond them together.
While the epoxy globs are curing, you can saw out the lesser and top plates. These plates will ascertain the shape of the curved wall, so lay them out carefully and saw them accurately. Brand each of the plates from two layers of three/iv″ plywood. It is a proficient idea to stack the plywood 4 layers thick and cut all four pieces at once. Bail two pieces together to make each plate, and offset any joints you have to brand. Apply 1.25″ drywall screws to clench the plates together until the epoxy cures.
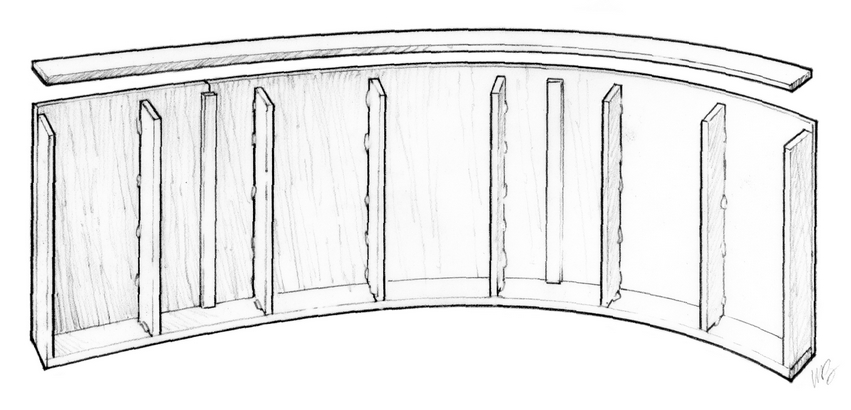
Curved superlative and bottom plates are bonded to the panel associates of the curved wall with thickened epoxy.
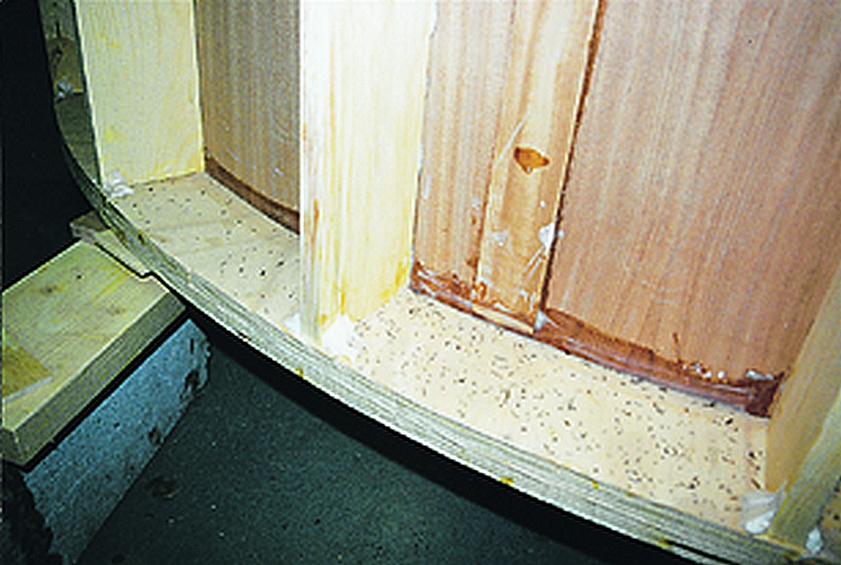
Detail of the back of the curved wall showing 1″x4″ studs, 2″ plywood plates, and a plywood butt block. Keep the butt block 1/5″ shorter than the plywood panel on each end so it will clear the superlative and bottom plate.
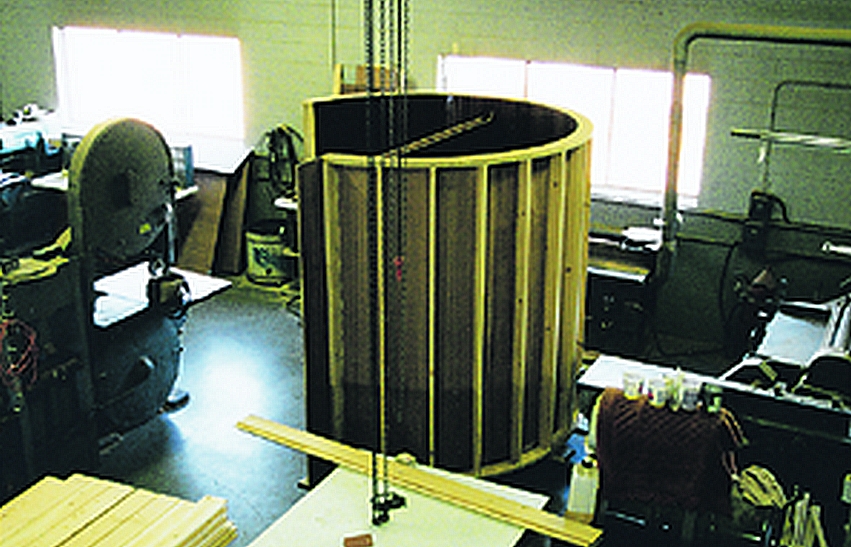
A semicircular shower enclosure is set for installation. Many of the curved walls for John's firm were built off-site in his shop. When the business firm is at the proper stage of construction, the pre-assembled walls will exist brought in and quickly installed.
Bond the console to the plates.
Y'all at present accept a large, flat wall with studs bonded to it and a couple of curved plywood plates that define the shape of the wall. All that remains is to put the two parts together. Depending on how much room y'all have, you tin gather the wall in the horizontal position or stand up the large panel and get together the wall in the vertical position. Either way, all you practise is clamp the plywood console to the curved plate. Mix some epoxy and bond the ends of the studs to the bottom plate using the same method as you did to bond the studs to the plywood. Pre-coat small areas where the stud meets the plate, and apply a good-sized glob of thickened epoxy so it is in contact with both the stud and the plate. You tin exist equally corking or sloppy with this performance every bit yous want. Just be sure you lot have a couple of large globs belongings the two pieces together.
When all the epoxy has cured, motility the wall to its concluding location (previously drawn on the floor) and spike it in place with nails or screws. Apply drywall or any finish you want to the plywood surface and the open sides of the studs and you volition have built a very off-white, polish curved wall.
Curved cabinet doors
Edifice curved chiffonier doors is a variation on the theme described above, only on a lighter scale. There are no fancy molds or presses to build. Jon used the plywood shelves on the back of the door to define the shape of the door and glued the plywood to it—no fasteners are involved.

How To Set Out A Curved Wall,
Source: https://www.epoxyworks.com/index.php/building-a-curved-wall/
Posted by: phippsfince1998.blogspot.com
0 Response to "How To Set Out A Curved Wall"
Post a Comment