

How To Build A Manger For Nativity Set
I am a follower of Christ and have a passion to share the adept news of the gospel with as many people as possible.
A manger volition add the glory of Christ to your yard this vacation season.
Prototype by OpenClipart-Vectors from Pixabay
My favorite fourth dimension of year is Christmas. I savor sitting by the Christmas tree and just watching the seasonal lights. When my wife and I decorate our firm, we try to brand certain that at to the lowest degree some of the decorations point us to the true significant of Christmas: the birth of Jesus Christ.
A few years later on we had congenital our house, we purchased an outdoor nascence set that came with Mary, Joseph, and infant Jesus so we could brandish an outdoor nascency scene. The set tends to blow over very easily and I was tired of constantly picking upwards the pieces.
Deciding to Build A Manger
I wanted to buy a manger to block the wind and make the scene more than complete but had a difficult time finding 1 that I liked. I really wanted a manger that looked great and would exist easy to store once Christmas is over. I decided to build a nativity manger on my own that looks prissy while up and stores relatively apartment in two pieces.
Piece of cake-to-Follow Plans for Building a Manger
One of the keen things about building a manger is that it does not need to be perfect. It is okay if it looks worn or if there are slight gaps hither and at that place.
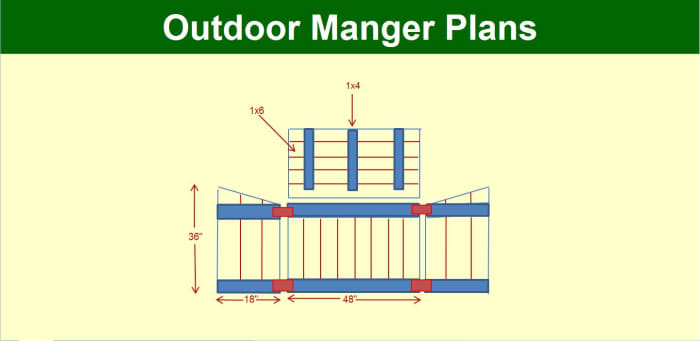
Manger Plans: An Overview
Eric Cramer
Project Supply List
The supply list for building your manger is nice and brusque. Be sure to pick out the straightest boards that you tin. Remember that board lengths are less than what they are called. For example, a ane" x half dozen" is actually a ¾" x 5 ½" board.
I used pine to construct my manger, merely you may wish to use cedar or light-green treated forest. If you use pine, you volition have to put a protective coat on it. This tin exist a elementary waterproofing, outdoor paint, or stain.
Supplies for Building Your Manger:
| Amount | Fabric |
|---|---|
| v | 1" ten 6" x 8' |
| 4 | 1" x 6" x 6' |
| 2 | ane" x 4" x 8' |
| two | ane" x iv" x six' |
| 2 | packages of 4" heavy-duty tee hinges (full of four hinges needed) |
| 1 | box of 1 ¼" screws |
| wood glue | |
| paint, stain, etc. |
Some Organizational Tips
In pencil, lightly number each of the boards starting with a 1" x 6" ten 8'. All of those should be number 1 through 5 and keep in social club of the supply listing so that the terminal one" x 4" x half dozen' is number xiii.
The cutting listing below will tell yous how each board needs to exist cut but practice non brand all of the cuts at once. Follow the steps in the sections below only in case you have to make an on-the-fly adjustment.
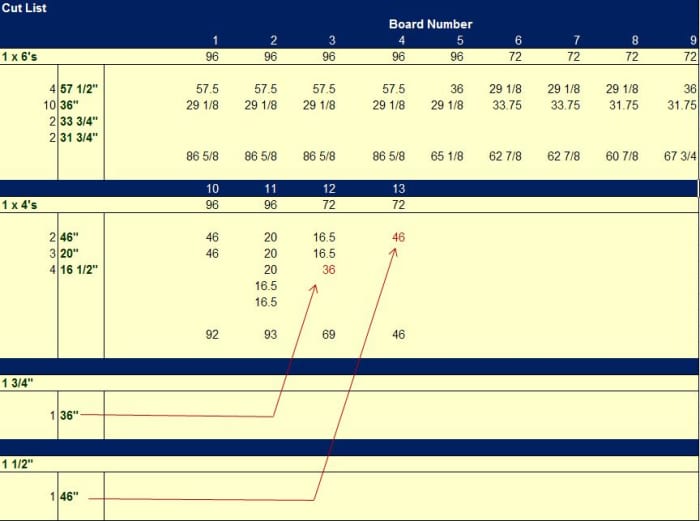
Detailed Cut Listing for Building a Manger
Eric Cramer
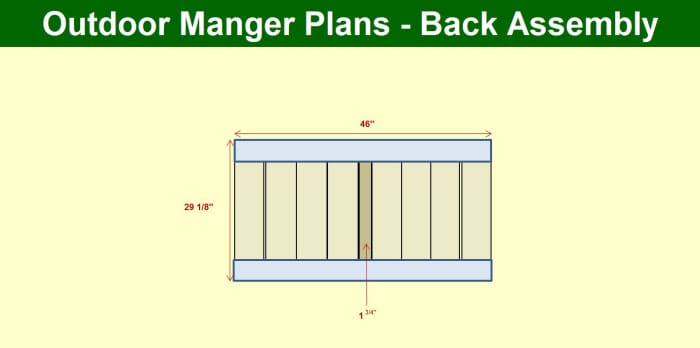
Manger Back Associates Plans
Eric Cramer
Roll to Go along
Read More than From Holidappy
Building the Back Wall of the Manger
The back wall of the manger is the best place to start because all of the other pieces need to align with it.
Cut Listing for the Back Wall
Take boards i-8 (1" x vi") and cutting each of them using the miter saw to a length of 29 1/8" starting with the end that was non numbered. Place the remainder of each board aside for later utilise.
Now cutting board number 10 (1" ten 4") into two 46" sections using the miter saw. The left part of the board is bit. Take board number 12 and using the miter saw, cut information technology to a length of 36". At present accept it over to the tabular array saw and rip it to a width of 1 ¾".
Assembling the Back Wall
Assembling the dorsum wall is easy! Only follow these steps.
- On a flat surface, lay the 1" x 6" ten 29 1/8" boards next to each other. Move them effectually until you accept the best fit. Once yous are satisfied, start on the correct side by taking the second board in and running a dewdrop of mucilage down the edge.
- Push the two boards on the correct together and line up the top and bottom of each and so that they are affluent.
- Take one of the one" x 4" 10 46" boards and lay information technology beyond the top.
- Drill two pilot holes through the one" 10 4" into the kickoff 2 boards and and then screw the boards together.
- Repeat the aforementioned process with the other 1" x iv" x 46" board on the bottom. Be sure to make sure that both of the 1" x 4" are affluent with the tiptop and lesser respectively.
- Repeat this aforementioned process with the side by side ii 1" x half dozen"s.
- Now take the ane" x 1 ¾" x 36" board and attach it using the aforementioned process. Putting this board in the center hides the fact that information technology is smaller than the rest of them.
- Adjacent, attach the remaining iv 1" 10 6" x 29 ane/eight" boards using the same procedure. The all-time tip that I can give yous here is to get slow and accept your fourth dimension. Make sure that the 1" ten 4" boards are affluent with the tops and bottoms.
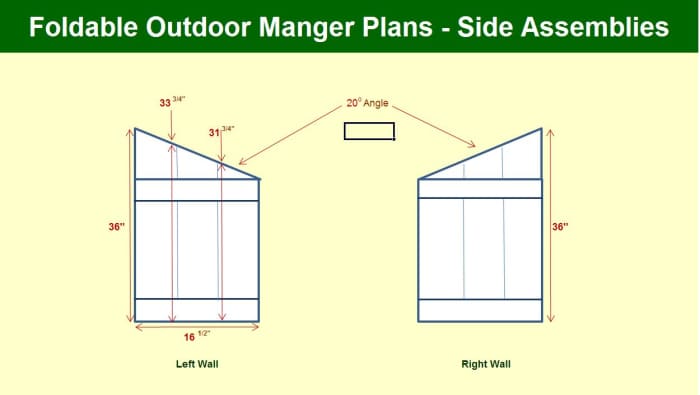
Manger Side Associates Plans
Eric Cramer
Edifice the Manger'south Side Walls
This is the trickiest section to build because it is critical to be accurate on the angle cuts. Become slow through the cutting portion of this section. Cut the angle portion get-go and and then cut it to length. You desire to be sure you're making the correct cut.
Cutting List for the Side Walls
- Ready your miter saw to xx° and cut the remainder of board number 5 (one" x six") as close as possible to the top.
- Then measure downwardly 36 inches from the high side of the bending cut and make a direct cut.
- Echo the aforementioned cuts onboard number 9 (1" 10 half dozen").
- Next, grab boards vi and seven (ane" 10 half-dozen") and make a xx°angle cut at the top of each and so measure out downwardly 33 ¾" from the high side and cut off the excess.
- Repeat the same procedure for boards eight and 9 (ane" x 6"), except cutting them to 31 ¾".
- Now take board number eleven (1" 10 4") and cutting two pieces to 16 ½".
- Practise the same with board number 12 (ane" x 4").
The reason that I am having you lot employ ii dissimilar boards is to try to buy the least amount of boards possible.
Assembling the Side Walls
- Split the boards into two piles, one for each side. Each pile should take the post-obit one" x 6"s: 36", 33 ¾", and 31 ¾". Both piles should accept two 1" x 4" x 16 ½" boards.
- Suit each pile so that the 36" boards are on the outside and the smallest boards are closets to each other.
- Pick a side to kickoff with.
- Take the 33 ¾" lath and run a bead of glue and push information technology upwards against the 36" board. Exist sure that the angles on top line up and that the bottom is flush. If your ends are not perfect, brand certain that the top lines up the best.
- Take the 31 ¾" board and run a bead of mucilage downward the side and button it against the other two.
- Once yous have everything the way you desire it, take one of the one" x 4"s and screw it affluent with the bottom of the side.
- Take the other one" x 4" and lay it straight beyond the top starting at the low side of the elevation.
- You may wish to use a square to make sure that it is as straight as possible. Repeat the same procedure for the other side.
- Make sure that the sides are going opposite directions.
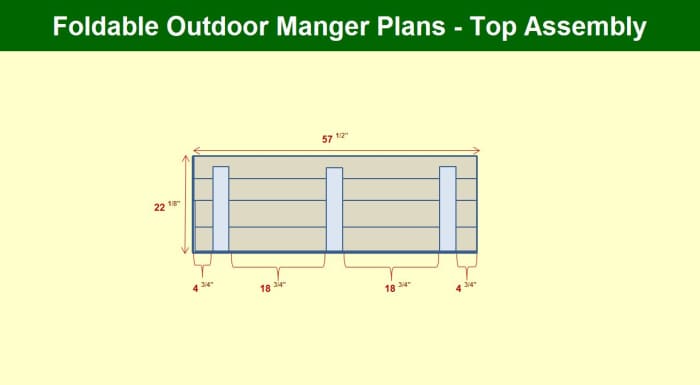
Manger Roof Assembly Plans
Eric Cramer
Building the Roof of the Manger
Cut Pieces for the Roof of the Manger
Grab the remaining i" x 6" boards 1 through four and cut them to 57 ½".
So accept board 11 (1" x iv") and cut three xx" pieces out of it. You are now ready to assemble the top.
Assembling the Roof
- Lay the 4 one" x 6" boards parallel to each other and endeavour a few different arrangements to make up one's mind how they fit the best together.
- Stand three of the boards on their ends and run beads of glue down them.
- One by one lay them flat and push button them against each other. Be sure that the top and bottom sides are flush.
- Take one of the three 1" x 4" boards and measure in four ¾" from the right edge and make a marker at the bottom.
- Do the same affair on the third board up.
- Line upward the 1" ten 4" with the marks and spiral it in. One edge of the one" ten four" should be touching the front of the "1 x 6", while the other finish is short nigh 2 inches.
- Now measure over 18 ¾" from the i" x 4" and brand a mark at the bottom and on the third board.
- Screw in the side by side 1" x 4" aligned with those marks.
- Mensurate over another 18 ¾" and make your marks and attach the terminal ane" 10 four".
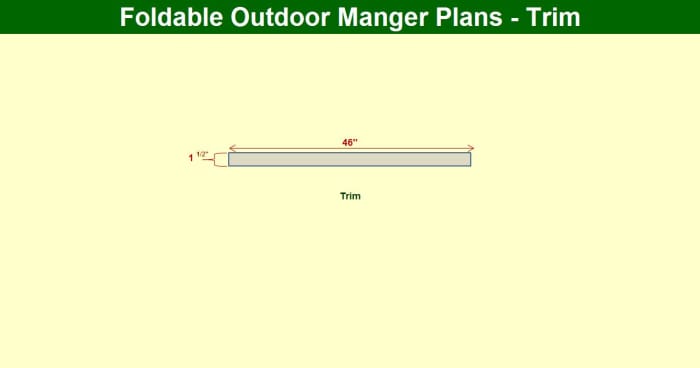
Trim for Manger
Eric Cramer
Trim and Last Assembly
The final cuts we have to make are using (1" x iv") lath 13.
- Cut it to a length of 46".
- Take it over to the table saw and rip it to a width of i ½".
- Lay it on the top of the back section and screw it to the top. Make certain that it is as flush equally possible on all sides.
- Lay the back downwards so that they side with the one" x 4"s is facing upwardly.
- Grab both sides and lay them the same mode. The short side of each should lucifer upward to the back slice.
- Take the hinges and lay them on each of the i" x iv"southward. Make sure that the hinges are even on both sides so that the wall will swing hands. The best way to cheque this is to mensurate how far each swivel goes in on the 1" x 4".
- Screw the hinges to the one" x four"s.
- Stand up the manager and close the doors until they both class ninety° angles.
- Take the room and lay it over the peak of the sides. The i" ten 4" brace on each side of the roof should fit flush confronting the sidewalls. The back of the tiptop is the side where the 1" ten iv" supports do not go all of the way to the stop.
- Once you become the roof to fit how you want it, spiral in two screws on each side into the 1" x iv" supports on the pinnacle. This volition hold everything in identify while you lot are using it.
The manger is now consummate. One matter that you may want to add is a small door hand on the outside of each sidewall so that y'all can tie the walls close when y'all want to store the manger.
Also, you may want to attach a large handle on the back to brand conveying the main piece easier.
My communication to you is to pick out your outdoor nativity prepare before building the manger to exist sure that the size is right. Changing the measurements should exist an piece of cake practise.
There are only two parts where you demand to be particularly careful:
- the angled cuts on the sides and
- the top braces are a little curt from the back of the superlative of the manger.
© 2022 Eric Cramer
Floriano Abreu on June 17, 2022:
It was a joy building this piece of cake to follow instructions. I wish I had done this years agone, information technology would accept saved me a lot of time over the years, with your like shooting fish in a barrel to build stable I can now store it subsequently use and open up it up in years to come. Fantastic thought.
Bless yous.
A.J. on Dec 04, 2022:
Directions are confusing. Cutting directions for meridian states lath 12 (1"x4") cutting to 36" length; rip to 1.75"..
OK. did that, and then assembling states utilise the ane"x 1.75 x36" in eye of back. The dorsum is only 29 1/eight" high. What is the extra length for??
Steve on November 04, 2022:
Thank you Mr Cramer for sharing you idea and plans! Only built ours and my wife loves it. Not just looks neat, but the storage part is a major bonus. Thank you again!
Eric Cramer (writer) from Chicagoland on October 20, 2022:
Great to hear! I promise he loves information technology!
David Grenier on October 20, 2022:
Thank you Mr. Cramer. This was exactly what I needed and mine turned out dandy. My wife'due south going to exist thrilled.
Michael H on March 09, 2022:
Like Gurnzy said! Nice looking stable though.
Gurnzy on Dec 09, 2022:
that is an America stable not a manger. The manger is where the hay and other feed goes, not the animals
churchnurse Patty on Nov 29, 2022:
Thanks for sharing! I accept looked all over the net for a nice looking like shooting fish in a barrel plan to build. Will post pic when done!
Bill T on November xiv, 2022:
On the back wall, 8 - 1 by 6 Plus a ane 3/4 equqls 48 inches. She are the 1 by 4 s cut to 46?
Nib on Nov 11, 2022:
I followed this program with a few small-scale adjustments and it came out great.
frank ratliff on October 27, 2022:
A little confused about the one i/ii by 48 trim piece. Just how exactly does it lay and how will ane one/iv screws agree it?
Danny on October 02, 2022:
I have mine almost done. I inverse the tiptop though. Went with 3/viii plywood and turned the roof support beams to run the width instead of the depth. Going to stain the whole thing then add straw or moss to the roof meridian. I am NOT a carpenter. Don't care for building stuff...never liked lumber! (I am a mechanic, or I mean was...i retired final year. just this project proved to be both elementary and satisfying for me. Cheers!
Dorothy on September 06, 2022:
This is not a manger. This is a stable. A manger is a feeding trough for animals. Jesus was non built-in in a manger. He was born in a stable and laid in a manger.
Jason Matthews from North Carolina on Jan 21, 2022:
Great idea and great instructions! This is awesome!
Eric Cramer (author) from Chicagoland on December 08, 2022:
The terminal size of the product is 57" wide and about 24" deep
Marcia on December 07, 2022:
Thanks for sharing - what size is the finished production?
RJK on December 10, 2022:
Using your plans as a basis for my Stable…I increased the size all around and made the side walls college so the xx° cut allowed the roof to sit atop the rear wall without whatever trim. I also added a lip to the front end edge of the roof and finally I added a floor too equally cutting a notch on the lower rear wall so I could run electric into the Stable. Thanks and know yous are appreciated for the plans. Have a Blest Christmas.
Eric Cramer (author) from Chicagoland on December 23, 2022:
Grand.M. - Yes, if you lot make everything bigger it should work fine. I would build the back wall first and then the two side walls and gather them before tackling the roof. That way you lot can verify that the size is correct.
1000.Thousand. on December 23, 2022:
Thank you and so much for posting this. I very much want to make this but I need to adjust your plans equally my Nascency pieces are taller and I have 9 pieces. My highest piece is 37 inches high. So I need a wider and bigger Manger. I am thinking of making the back with 7 boards instead of v and the sides with v boards instead of 3. I get stuck on the cuts though...Can I only add together 2 inches to each lath to accommodate the height? I would be grateful for your advice. Cheers! Have a Blest Christmas!
Cheryl Ann Cox on December 21, 2022:
This is beautiful and the directions await keen, only it is not a manger. It is a stable. Peradventure yous could also brand a manger to place in the stable?
Bill on December 11, 2022:
Great commodity. I followed the instructions. The only fault was identified in the comments section past JohnC (the 36" ripped 1.75 board (back wall middle piece) should too exist 29 1\viii...instructions phone call for 36' cut...). The entire procedure, including the trip to the hardware store, was nearly 3 hours. My wife loves it. I also appreciate the authors' ability to limit the amount of scrap woods. A real coin and time saver.
Kelly from NJ, United states on November 29, 2022:
Very useful!
Doug R on Oct 14, 2022:
Good idea ime going to brand one only add a hinged roof and apply rough cut pallet woods to brand it more rustic and besides add hay on the roof. Thanks good job!!!!
JohnC on December 14, 2022:
the 36" ripped 1.75 board (back wall center slice) should also exist 29 1\8...instructions call for 36' cutting...
Eric Cramer (author) from Chicagoland on December 02, 2022:
Corrgc,
The back wall should exist 29 1/8 high. I made an fault when I redid my plans to put on here. The front of the side walls should exist 36" as stated before and the back should come downward to 29 1/8. I sincerely apologze for the error. I have updated the hub and the plans that are attached every bit pictures. Let me know if you have any more questions.
corrgc on December 02, 2022:
Eric Help! I followed the instructions (I think) and take come across a problem. The tallest wall post on each side is 36" per your instructions - the same side as the back wall. This makes the walls too short. In your picture information technology looks like the tallest wall mail is over twoscore". Where did I go wrong?
Eric Cramer (author) from Chicagoland on Nov 29, 2022:
Amen! I couldn't concord more than Val!
Val Swabb from South Carolina on November 29, 2022:
Thanks for these astonishing and piece of cake to follow instructions!
I have always wanted a nice manger scene to put outside, but the 'overnice' (not plastic ugly ones) have been outside my families price range. This will significantly subtract the costs involved, and give me a great display to remind people that Christmas is about Christ, not Santa and presents! Jesus was the ultimate present, sent from God Himself!!!!
Amy D. from Generally in My Own Little Globe on Nov 11, 2022:
Bully hub and directions. I accept a stack of wooden pallets in my shed that are asking to be fabricated into something. This would be great. I wouldn't have to spend the money to have a dainty looking manger.
Eric Cramer (author) from Chicagoland on September xx, 2022:
You lot do not display a manger scene to worship it, simply as a reminder that God left His throne and came to earth every bit a infant to die for your sins and mine. It is that what we celebrate at Christmas. Information technology points to the savior amidst all the capitalism that the world has turned Christmas into.
Mark Knowles on September 19, 2022:
Wow - and then the real pregnant of Christmas is to waste time and endeavour building such things and spend money on ebay ownership graven images for idol worship?
Odd - I always idea it was the Winter Solstice. :D Nice to know the Pagan tradition it was taken from was a lot less commercially driven than the Christian version.
Voted "up" and "depressing."
Maria Magdalena Ruiz O'Farrill from Borikén the great country of the valiant and noble Lord on September nineteen, 2022:
How beautiful to know when somebody writes about the real pregnant of Christmas. Great idea and hub. Blessings to you, yours and to the readers.
Stephanie Bradberry from New Jersey on September 19, 2022:
This is cool. I never would have thought of building my ain manger before. Just this article lays everything out so nicely. I think if I built this, or something very similar, it would plough into a picayune playing identify for the kids. I call back I would start with building a trivial model sized i from all the left over wood in the woodshop before going the total monty.
Leah Lefler from Western New York on September 19, 2022:
I take thought of making one for our front lawn - I was thinking of cutting out figures from plywood (though using the jigsaw still scares me a footling)!
Eric Cramer (writer) from Chicagoland on September 19, 2022:
leahlefler - For the figures I have been using a ready that has rope lights around the edges attached to a wire frame. When the rope lights get out, I will probably build a set and employ either white christmas lights or a spot calorie-free at night.
Tyler Tobin from North Carolina on September 19, 2022:
I dearest Christmas and especially love live nativity scenes. Your manger design is perfect for a live nativity scene and would brand a great addition to any nativity. Neat Hub!
Nettlemere from Burnley, Lancashire, Britain on September 19, 2022:
Really thorough instructions which is platonic for novices attempting the project. Specially useful to have the list of what to purchase because I always take difficulty working that sort of thing out.
livingsta from Britain on September xix, 2022:
Expert idea for people who desire to build one! Christmas is non far away! Voted upwardly! Useful!
Evie Lopez from Sunny Florida on September nineteen, 2022:
Congratulations! Doesn't this make the second time two of your hubs have been selected equally Hub of the Day? I think I know why. You were blest with an astonishing gift in carpentry, only similar our Lord Jesus Christ, and since it glorifies His nativity, of course it will smooth.
Great hub. This volition non only make a dandy projection for a home but for a pocket-size church building as well. Voted up and useful.
Angelo52 on September 19, 2022:
Adept information on edifice your own manger. Looks like it would exist a nice addition to any Christmas chiliad.
Alissa Roberts from Normandy, TN on September nineteen, 2022:
Dandy instructions and those blueprints are certain to come up in handy! I love the fact that it is piece of cake to store in one case Christmas is over. Cheers for such a useful hub and congrats on your HOTD!
kelleyward on September 19, 2022:
Congrats ercramer on the HOTD! Fantastic job! Voted upward, Blessings, Kelley
Leah Lefler from Western New York on September 19, 2022:
This is great, ercramer! Your blueprints and assembly plans are then like shooting fish in a barrel to follow. This also reminds me that Christmas is only iii months away - yikes! What exercise you utilize for the people in the creche scene? Do you lot make wooden cut-outs to represent the Holy family or do you use plastic figures?
demiwritesagain on September 19, 2022:
Thank you for sharing this! I observe it very useful; detailed and very informative! Keep information technology up! :)
kmaskreations on September 19, 2022:
Slap-up hub! Thanks for sharing. BTW, keep in mind when someone ignorant shares a portion of their tiny encephalon equally a comment to your Hub that is an insult to your adept work, you can remove it. Personally, I don't allow negative comments on my Hubs.
RTalloni on September xix, 2022:
Congrats on your Hub of the Day accolade for this detailed tutorial on building an outdoor manger. Well done with expert tips throughout the hub.
Timir Blekko from Boston, MA on September 19, 2022:
I will build something like this using your instructions...thanks for sharing this hub with all of u.s...
v1p3r on September 19, 2022:
Nice Work
Voted up
WillStarr from Phoenix, Arizona on August 26, 2022:
Proficient betoken!
I think I'll build one of these!
Eric Cramer (writer) from Chicagoland on August 26, 2022:
Thanks! I though about doing that, but decided against it to keep the main part light enough to carry downwardly to the basement.
WillStarr from Phoenix, Arizona on August 26, 2022:
Good work!
It looks like you could also hinge the roof to the back wall then you could just fold it back when set up to store, with the sides folded to the front every bit shown.

How To Build A Manger For Nativity Set,
Source: https://holidappy.com/holidays/How-to-Build-an-Outdoor-Manger
Posted by: phippsfince1998.blogspot.com
0 Response to "How To Build A Manger For Nativity Set"
Post a Comment